Description
Included in the sale: Depends on selected variant. All variants include all necessary parts (including pre-programmed Pico module) and 3D printed mounting bracket.
* Assembled: Fully Assembled and Tested
* Kit: Only the surface-mount parts are installed, everything else is loose (see kit-assembly page)
Fully unassembled is not offered on this model. Manual assembly is not pleasant with 0402 parts.
Not included: SD card
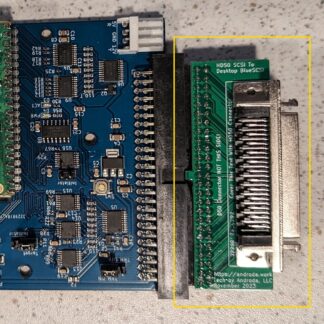
BlueSCSI V2 Desktop
BlueSCSI V2 is an open (Creative Commons Non-Commercial) hardware and software fork of ZuluSCSI’s SCSI2SD implementation, targeting the Raspberry Pi Pico’s RP2040 microcontroller. This version uses Full Size SD Cards (or MicroSD in a size adapter).
System Compatibility
BlueSCSI is compatible with a huge variety of SCSI hosts, including: Vintage Apple Macs, Sound Samplers, SGI workstations, and many others. Please see the GitHub Wiki for more information on specific system compatibility.
WiFi
Some additional tips for setting up WiFi can be found here.
Initiator Mode
Initiator Mode Instructions are found here.
Setup
- Find an SD card
- Desktop style uses a full-size SD, all others use MicroSD
- Format your SD card as the “Fat32” or “exFAT” filesystem types
- They probably are formatted this way already
- Find or create a disk image
- See the Usage section of the GitHub wiki for premade images or instructions on how to create your own
- BlueSCSI emulates hard drives and CDROM drives
- Copy the image to the SD card and name appropriately
- Ensure these jumpers are set properly:
- PWR_ON (a jumper is normally installed here)
- TRM_ON vs TRM_OFF (this is termination enable or disable, please set as appropriate)
- Initiator vs Target (normally installed on the Target side, must be moved for Initiator Mode)
- Boot
Disk Image Naming Convention
Convention For Hard Drives: HDXY_OtherText.hda
- X is the SCSI ID, Y is the SCSI LUN (most often LUN is 0)
- Example: HD10_Sys7.5.3.hda
- This hard drive image would appear to the system as SCSI ID 1, LUN 0
Convention for CD Images: CDXY_OtherText.hda
- Same as hard drive, X is SCSI ID and Y is LUN (LUN is most often 0)
- Example: CD60_CivII.hda
- This CD image would appear to the system as SCSI ID 6, LUN 0
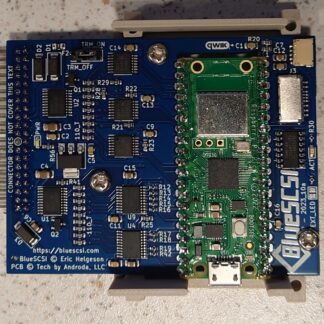
LED Indicators
The green LED on the Raspberry Pi Pico module (this is the smaller green PCB) will flash a code if there is an issue. 3 flashes indicates it can see the SD card but is unable to read any contents. 5 flashes indicates it cannot see the SD card at all. If you see a few blinks and then the LED stays off, you’re all set. After startup, this LED serves as a disk activity indicator.
In addition, there is a white LED for power and blue LED for disk activity.
Troubleshooting
- Check file naming, follow the convention or BlueSCSI won’t see any disk images
- Try powering using the “berg floppy” connector, or USB
- Check the log.txt file which is written to the SD card
- Reformat or try another SD card
Kit Assembly
Assembly Instructions are available here: https://bluescsi.com/docs/Kit-Assembly-Instructions
Hardware Notes
- The PWR_ON jumper must be installed for normal operation when powering from the SCSI bus or “berg floppy” connector
- If you are exclusively powering BlueSCSI via USB, this jumper can be removed to isolate power from your vintage system
- In case of USB power, please use a power supply rated for 1A or more – surge currents can reach 750mA in full power situations
- Termination enable/disable is handled with a jumper
- TRM_ON for termination enabled
- TRM_OFF for termination disabled
- External LED hookup now has three pins, and the center is positive
- This better handles cases where the original LED hookup is long enough, but happens to be a 90 degree angle.
- Put the red wire in the middle and off you go
- “BACK FEED” is for certain use cases where it’s expected that the hard drive (or CDROM drive) should supply power to the SCSI termpower line
- If you are powering BlueSCSI from the SCSI bus, don’t place a jumper here
- Only USB power or the “berg floppy” input can supply power to the SCSI termpower line
- This is fuse-limited to 750mA